Ads Bidvertiser

Monday, February 23, 2009


Sunday, February 15, 2009
More on the Floor
Floor boards are finished and trial fit. I think they look actually fine, too. The flooring was all fabricated using small angle and square tubing, and the floor panels are plywood, carpeted covers. I made the panels and console all removable, and then formed some rocker trim on my metal brake. I also made a nice fitting master cylinder access panel in the driver's side floor. All in all, I like the way the flooring looks, and I like to be able to remove panels easily for shifter work, brake adjustment, etc.
 Above shows the pieces beginning to get mounted, and the little brake master cylinder access panel.
 Close shot of shifter and access panel area.
 Here's the inside view of the console. I made this by shortening an old large drill press top cover, cut the forward angle and lined up all points for the shifter assembly.
 Here is another close shot showing the rocker trim I made from more kind freebies at Creer Sheet Metal. I bent them on my homemade metal brake and formed little notch area with tinsmith pliers.
 Here is the brake access panel area shown installed. Fits well, only two trim screws hold it in place.
 There is the entire setup with the seat baseboard in place. The shifter is a Lokar nostalgic automatic-trans unit. Not exactly period correct, but looks good.
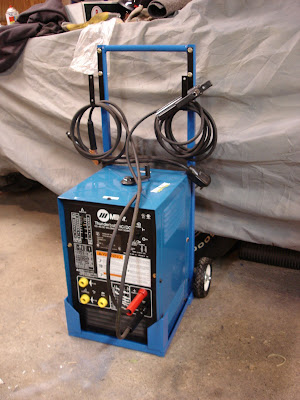 This shows the side-tracking I often do from my old car obsession. I decided to make a dolly for my DC arc welder, since the mobility it comes with from the factory is a little useless. I can wheel it around now, and keep the cords mounted out of the way. Yes, this fits under the more "obsessive-for-tools-because-of-old-cars" category... but who needs a stick welder for old car restoration? I love my MIG's but this little monster can make some strong, X-ray quality welds on bigger stuff (like frames) inside or outside, with safer DC amperage and 7018 rod. See, I have no need to worry, I always justify my tools...(cough)...somehow!
 Above shows the pieces beginning to get mounted, and the little brake master cylinder access panel.
 Close shot of shifter and access panel area.
 Here's the inside view of the console. I made this by shortening an old large drill press top cover, cut the forward angle and lined up all points for the shifter assembly.
 Here is another close shot showing the rocker trim I made from more kind freebies at Creer Sheet Metal. I bent them on my homemade metal brake and formed little notch area with tinsmith pliers.
 Here is the brake access panel area shown installed. Fits well, only two trim screws hold it in place.
 There is the entire setup with the seat baseboard in place. The shifter is a Lokar nostalgic automatic-trans unit. Not exactly period correct, but looks good.
 This shows the side-tracking I often do from my old car obsession. I decided to make a dolly for my DC arc welder, since the mobility it comes with from the factory is a little useless. I can wheel it around now, and keep the cords mounted out of the way. Yes, this fits under the more "obsessive-for-tools-because-of-old-cars" category... but who needs a stick welder for old car restoration? I love my MIG's but this little monster can make some strong, X-ray quality welds on bigger stuff (like frames) inside or outside, with safer DC amperage and 7018 rod. See, I have no need to worry, I always justify my tools...(cough)...somehow!
Thursday, January 22, 2009
Consider it Done

Done: The rear view mirror that I cut, welded, threaded and finally decided to install. I got this little mirror for pennies at a scooter repair shop. I had complained to Jenna about the need for a set of mirrors that would look acceptable on the Model T. And I didn't really want to fork out the money for plastic cheapo hot rod aftermarket ones, let alone "billet" style newbies...yucky! I mumbled to Jenna that I needed small, thin, round mirrors with a baby fixture that I could modify. She told me to check a...(cough)... scooter store. Scooter store? I vowed never to affiliate with such annoying falsities long ago, when I saw the Vespa craze creep into style. She just couldn't be right- what kind of replacement mirrors are they going to have, anyway? Well, I was the wrong one! These turned out amazing after a little for-mentioned cutting, welding, etc. And they were CHEAP compared to anything out there, not to mention stainless and chrome plated steel all the way through.

Done: Steering column fabricated, oldie 'wheel center and gauges installed. Column was fabricated from scratch and some old u-joints. Gauge bezel is an old piece of brass I machine-turned and cut to follow the factory lines where the original dash items would sit. Column mounted tach, old Signal Stat 900 turn switch, oil pressure and coolant temperature gauges are in and done. Oh, and they actually all work!

Done: Fabbed a seat framework that will allow me to sit at a decent level, without being too high like the stock ones. That, and the original seat frame/riser panel was long gone. I made this little scrapper out of angle and light square tubing from old cut off ends in the drafty garage. The seat frame is set to hold a single sheet of plywood, and the foam cushion will rest on that. I've tried the plywood on there, it works good. The seat's angle is comfortable, and will look fine.
Thursday, December 18, 2008
Hot Rods of the 1940's


Neat stuff here. These are photos of dry lakes and dual-purpose roadsters. Notice the inherent beauty in these individual builds, and the differences. And also notice they are all the same car...'26 and '27 Model T Roadsters. I especially like the little black one in the background of the last picture. Very genuine, very little! And very "hot rod" for that time.
Also, look at the green beauty with the gal waiting inside. Windshield and lights are just removed as it waits for the opportunity to make a speed trial. Little '40 caps on white walls front and back-very hard to find in the WWII era. Notice the fronts are motorcycle tires, white-walled on both sides.
I like these little beetle bugs. I like the history of their making. I like how they look. These aren't overdone. These aren't Bling Bling. Gosh, they don't look mean, either. They look like jalopy projects built by experimenters, modifiers....but so fitting and proper. This is what real hot rods looked like, because these were...are... real hot rods.
Thanks to Don Montgomery and Robert Genat for the wonderful books I stole these pictures from. Want to learn about real hot rods? Read their books, as well as articles in The Rodder's Journal.
Sunday, December 14, 2008
Spreader Bar The Right Way!

Here's more completion on the little buggy car. Its the spreader bar- that little rod going from one frame horn to the other right at the front of the T-V8. This little abandoned project car had a spreader...but it was just wrong. The bar was about 2" diameter heavy tube welded to each frame horn, with the original mounting holes all welded shut. It was way too big, way too fake, and welded on. They aren't supposed to be welded! That is not how the early hot rods were done. They should be bolted on through the existing frame horn holes where the little splash apron originally would attach.
So I cut the oversize welded-on pipe off and drilled the original frame holes back out, pinpointing the location from the inside frame view. I then cut a piece of smaller tubing and welded nuts into large washers on the tubing's ends. The nuts were off centered in order to push where they would allow the spreader bar to sit: right at the front of the frame horns. After careful fitting, I welded up the assembly and bolted it on. Now that is how they are supposed to look.
Why am I so opinionated about the spreader bar, yet allow the car to appear old, weathered and unfinished? Well, it is old, weathered and unfinished. Just like it is supposed to be. Just like many a little jalopy bought and torn apart by eager boys after WWII, stripped of fenders and running boards and hopped up in the most literal and genuine sense.
Sheet Metal Brake

I'm still on the "make it yourself" thing. Well truly, I'm always on it. And this one is no different. The above pic shows my messy, tiny table where I use my standby vise (given to me years ago by my employer). And in the vise is my homemade sheet metal brake. I built this because I recently got Eastwood's shrinker/stretcher set, and I needed something to make nice straight bends to try out on the shrinker/stretcher. So I made this little 20" attempt at a brake, and it turned out fine. The steel is scraps I have around, and the handles are old ones from a broken drill press. This little thing works...hows that for post traumatic brain injury time? Woo Hoo! So now I can make window channel pieces and fender well strips out of sheet steel by simply making a straight bend on the brake, and then forming the proper radius or curve on the shrinker/stretcher. Man alive Jackson Five, I like doing this stuff...
Sunday, December 7, 2008
More progress...

Wiring diagram and harness is now officially done for the '27. And it was actually fun to do. I was forced to look at books and diagrams, to wrap wire leads, and to install everything neatly and safely. The battery has room only in the trunk, so I decided to use the remote solenoid as sort of the main junction block for positive voltage. I ran huge wire from the battery terminal through and under the body, and up to the firewall outside. The big wire was installed with good protection and lots of supports. During this project I quickly realized that the body needed final mounting before I could secure the wiring that passes under, through, around, etc., the body. And this became a rewarding but tedious project its self. I did not realize the body would flex and bend as much as it did while making body mounts and securing it to the frame. But soon it was done, after much spacing, adjusting, etc. And now I have all the wiring hooked up, tested and working right.
The picture above is the harness diagram I made. It shows how I wired the buggy and what choices I made. The headlights are Dietz-type 7" sealed beams and the rears are '39 Ford. The front has turn signal lights from a '68 Mopar, and the turn signal switch is an old Signal Stat 900 that doesn't come with an indicator light on the switch. (That is why it only had 6 wires, not seven like all the plans I saw explained).
And the best reward was the test drive(s). The little gauges are tachometer, oil pressure and water temp, nothing more. And the test drive got me quite excited as well as it tought me to adjust and tighten the rear 4-link setup I made. A rear end has a tendency to hinge up and down if the 4-link bars aren't tightened. I knew that....no really...! It's good I was able to see the reason the driveshaft kept getting closer to the floor (and fuel line!). Nowadays my new plan is to remember what is in mock-up stage and what is not. You see, I have too many untightened bolts!
Notice the old headlight switch- I used "PARK" setting for low beams, and "HEAD" for high beams. This way I don't have to install a brights switch.
Thursday, November 6, 2008
Make it yourself!
I'm back to the wonderful old pastime of working on my 1927 Model T Ford Roadster. It is just like old times: I walk into my drafty shop and start fiddling around with tools until I actually feel like I've fixed or built something. It's nice to feel close to being back in the car groove, even though I don't last as long as the pre-injury days! But I get a few precious hours every week to tinker with the clinkers (since the doctors still haven't released me to work). Pictures below show what I've been doing lately with the '27 jalopy.
 The above picture shows my completed door panels on the pass. side. I finished the actual door-attached ones last winter, but the rear panels I did in October. Don't worry, the bottom seams are covered when a seat gets installed.
You can see my fiddling with the floor area and the shifter porch/ trans tunnel cover. I still haven't decided what I'm going to finish there.
 Here's the rust zone on my driver's door. Both doors need lower patches, so I marked where the replacement panel will fit. I then grabbed some sheet steel (kind freebies from Creer Sheetmetal's scrap!!) and began trimming it to shape on my band saw. I originally made a paper pattern enabling me to trace the shape onto my sheet metal, leaving it long enough to be curved into proper shape and still fit the entire needed area. The piece got it's enjoyable run on my homemade English wheel, where I realized it isn't as easy as I thought it might be. Well, it wasn't that bad...
 Speak of the devil, the above picture shows my homemade attempt at an English wheel! This is the tool I used to shape the vertical and horizontal curve of my door's patch panel. I made this baby from a foundation buck that I cut up and reinforced, as well as a trailer jack (adjuster) and a big clunky caster wheel (upper anvil). My friend's dad machined the caster wheel's surface flat, and I welded up this behemoth. It is a far cry from anything any reputable company makes, but it was a fun distraction involved with the old car obsession. And yes, if you're noticing my "reinforcements", the English wheel does flex. (Cough)... too much flex...
 But I ended up with this, the lower door patch that will be welded in this weekend! After cutting it from my pattern I formed the curves on the wheel, test fit a million times, formed some more, and finally punched the overlap areas on the top end with my pneumatic tool. It actually fits well! And again, thanks to Creer Sheetmetal for hooking me up with nice pieces from the metal salvage bin. One of the main guys there has a beautiful '39 Ford Coupe that is stunning...Oh Boy!
I will cut the bad zone of each door soon, and make a mirror-image patch panel for the passenger door, too. It is fun, this old car stuff! And I like the idea of making stuff yourself!
 The above picture shows my completed door panels on the pass. side. I finished the actual door-attached ones last winter, but the rear panels I did in October. Don't worry, the bottom seams are covered when a seat gets installed.
You can see my fiddling with the floor area and the shifter porch/ trans tunnel cover. I still haven't decided what I'm going to finish there.
 Here's the rust zone on my driver's door. Both doors need lower patches, so I marked where the replacement panel will fit. I then grabbed some sheet steel (kind freebies from Creer Sheetmetal's scrap!!) and began trimming it to shape on my band saw. I originally made a paper pattern enabling me to trace the shape onto my sheet metal, leaving it long enough to be curved into proper shape and still fit the entire needed area. The piece got it's enjoyable run on my homemade English wheel, where I realized it isn't as easy as I thought it might be. Well, it wasn't that bad...
 Speak of the devil, the above picture shows my homemade attempt at an English wheel! This is the tool I used to shape the vertical and horizontal curve of my door's patch panel. I made this baby from a foundation buck that I cut up and reinforced, as well as a trailer jack (adjuster) and a big clunky caster wheel (upper anvil). My friend's dad machined the caster wheel's surface flat, and I welded up this behemoth. It is a far cry from anything any reputable company makes, but it was a fun distraction involved with the old car obsession. And yes, if you're noticing my "reinforcements", the English wheel does flex. (Cough)... too much flex...
 But I ended up with this, the lower door patch that will be welded in this weekend! After cutting it from my pattern I formed the curves on the wheel, test fit a million times, formed some more, and finally punched the overlap areas on the top end with my pneumatic tool. It actually fits well! And again, thanks to Creer Sheetmetal for hooking me up with nice pieces from the metal salvage bin. One of the main guys there has a beautiful '39 Ford Coupe that is stunning...Oh Boy!
I will cut the bad zone of each door soon, and make a mirror-image patch panel for the passenger door, too. It is fun, this old car stuff! And I like the idea of making stuff yourself!
Sunday, October 12, 2008
Completion
 Here's the orphan car that patiently waits. It's my '64. It is also the first real all-around project I've ever started. And no, it isn't done...but I can finally say that it's getting close. The picture to the left shows the exciting progress milestone-I finally got the back of the car put together! It has been a long wait, but the rear lights, taillight housings, trim pieces, gas door and rear bumper are on! And no, this car is not even close to perfect. But taking this long on a first time car "restoration" is many lessons learned. It is also an irritating cause of wanting to do every prior step over again. As time passes and experience increases, my ability to detect shoddy workmanship (my own shoddy workmanship) increases. I just have to remind myself this is part of the journey, and that I'm not the pro I often think I am.
The '64 is looking great for a careful budget project. Heck, it's definitely worth the "20 footer" status, and maybe even ten feet on a cloudy day! Jokes aside, it is still a cool old clunker and I enjoy working on it again.
The car has, again, been many lessons learned. I made the floor pans and trunk pan from scratch, and welded in 1/4 panel repairs as well as fender patches. Fitting the car together has been a big obstacle, and I realize more and more how much this car has been wrecked, bent, rusted, twisted or replaced.

But I have the back of the car looking like it should for the first time in almost five years! And that was rewarding to be able to do, given my injuries and the junky-ness of this car. The bumper is a re-chromed one from back east, and wasn't exactly straightened like it should be. Also, the rear frame extension showed visible damage from a wreck, but the mounting holes looked right. Well, they weren't right! Here is what I had to do to get the bumper to fit...


As you see, I had to cut the bracket in order for the holes to line up, as well as cause the bumper to twist into proper shape. I tacked the new position of the bracket, put everything together for test fit, then removed and fully welded the bracket, including patch pieces to strengthen the new setup. Again, this shows that the car is just one problem after another. But it also allows me to learn! Besides, I like old cars.
Monday, September 29, 2008
Going Continental
I may not have mentioned my intention to move to France. Some may have guessed, after I mentioned "driving a lot in Europe" while considering my next purchase, that I may not be long for the UK. Well I can now inform you my specific intended destination is the south of France, somewhere between Nîmes and Perpignan. I'm not sure where yet.
And at this rate, the Lotus and the Fiat will be going with me. Actually, I never really intended to get rid of the Fiat, though transporting it to the south of France could be, um, time consuming. The Lotus, however, is not selling. It seems a global banking crisis is not the best time to try and sell a luxury item. Who'd have thunk it??
Ironically, I think I'll have a better chance of selling it in the Côtes d'Azur than I do in the UK. This is a millionaire's playground, where £10,000 is an evening's bar bill and Jaguar XJ-S convertibles go for £25,000, even though they struggle to reach a third of that value back in Blighty.
I was contemplating this when it dawned upon the French are probably as big in the classic cars scene as the British. It is they, after all, who host the most prestigious classics race in the world, the Le Mans Classic. And when the classic sportscars tour came to Silverstone this month (I got complimentary tickets from a nice chap called Guillaume, who is a classic sportscars organiser from Paris) the pitlane was awash with French accents. Far more French folk than British, even here in Silverstone. In fact, since my car has been for sale, two thirds of the serious approaches have been from French people.
If I were going to move anywhere in Europe, I can't think of a better fit for the classics enthusiast than France.
The Italians love cars, but can't be bothered with old ones (with a few notable exceptions). The Germans love efficiency, so that's that really. The Spanish are indifferent. The Swiss government positively hates cars, and while the Swiss themselves drive around in some of the most expensive cars in the world, the only Swiss person I know who is fortunate (and rich and half English) enough to have a stable of vintage sportscars only bothers to drive them when he's going to France for a few days. The Dutch are up there and enjoy their motorsport, but the French beat all comers hands down when it comes to passion and enthusiasm for classic cars.
I actually look forward to driving the Lotus on French roads for a few months. We're aiming to move in spring 2009 so, savings permitting, I may well be flinging the Lotus around some French country lanes in the spring sunshine.
That would be nice.
And at this rate, the Lotus and the Fiat will be going with me. Actually, I never really intended to get rid of the Fiat, though transporting it to the south of France could be, um, time consuming. The Lotus, however, is not selling. It seems a global banking crisis is not the best time to try and sell a luxury item. Who'd have thunk it??
Ironically, I think I'll have a better chance of selling it in the Côtes d'Azur than I do in the UK. This is a millionaire's playground, where £10,000 is an evening's bar bill and Jaguar XJ-S convertibles go for £25,000, even though they struggle to reach a third of that value back in Blighty.
I was contemplating this when it dawned upon the French are probably as big in the classic cars scene as the British. It is they, after all, who host the most prestigious classics race in the world, the Le Mans Classic. And when the classic sportscars tour came to Silverstone this month (I got complimentary tickets from a nice chap called Guillaume, who is a classic sportscars organiser from Paris) the pitlane was awash with French accents. Far more French folk than British, even here in Silverstone. In fact, since my car has been for sale, two thirds of the serious approaches have been from French people.
If I were going to move anywhere in Europe, I can't think of a better fit for the classics enthusiast than France.
The Italians love cars, but can't be bothered with old ones (with a few notable exceptions). The Germans love efficiency, so that's that really. The Spanish are indifferent. The Swiss government positively hates cars, and while the Swiss themselves drive around in some of the most expensive cars in the world, the only Swiss person I know who is fortunate (and rich and half English) enough to have a stable of vintage sportscars only bothers to drive them when he's going to France for a few days. The Dutch are up there and enjoy their motorsport, but the French beat all comers hands down when it comes to passion and enthusiasm for classic cars.
I actually look forward to driving the Lotus on French roads for a few months. We're aiming to move in spring 2009 so, savings permitting, I may well be flinging the Lotus around some French country lanes in the spring sunshine.
That would be nice.
Subscribe to:
Posts (Atom)