-->

Ads Bidvertiser

Tuesday, October 20, 2009

Broadcast From Foreign Soil

It's been over a year with no post. Wow! Life has run away with me. I guess I've lost subscribers by the boat load as well.

Well, lots has happened. Firstly, the Lotus is sold. To a Frenchman living near Cambridge, a lovely guy who is perfect for that sort of vehicle - loves to do his own servicing, etc. He has just relocated from the south of France to Cambridgeshire for work.

Secondly (and here's the big one) I finally did it! I used the money to relocate, ironically given who bought the Lotus, to the south of France. So here I am, on the outskirts of Uzes, on the border between Provence and Languedoc-Roussillon, writing my first blog post in flippin' ages!

And what of the Fiat?

It had another marathon haul across Europe. The result of which was a knackered wheel bearing, but never mind. It was an epic performance from the little car and it got me there without issue. I went from Dover, England to Uzes, France in 15 hours. That's not bad in a modern car, never mind in a 1971 Fiat with 15bhp (if you're lucky). My tactic was to slipstream trucks the entire way and it worked well. 0600 start in Dover and rolled up the drive in Uzes at 2300.

And I sang loudly most of the way to alleviate the boredom. Stereo? What stereo?

Of course, we now have the hassle of getting the Fiat on to French plates (just declared it as exported to the UK authorities yesterday) so the little car from Milan will, having spent the first 30 years of its life pottering about Italian city streets, have been driven from Italy to London, all over the UK and now back down to the Mediterranean once more.

One of the things the French want, before you can register *any* car in France, is proof of EU type approval. This is ludicrous for cars that were bought in and have never left the EU - what's the point in a common market then? - but there's no telling the French authorities that. Fortunately, wife being Italian and all, we were able to procure a faxed copy of an original Fiat 500 F type approval document from the 1960s, courtesy of one of the Italian Fiat clubs. We read some people have spent hundreds of Euro buying such a document, so count ourselves rather fortunate.

Now all we need to do now (besides a lot of form filling and queueing) is organise a CT (or Controle Technique - the French equivalent of the MoT, the British safety check). After that we'll be all set to get some French plates on this baby, and add the British ones to the mantelpiece, beside the Italian ones that came off it in England.

After we buy a new battery that is. The old one packed up the other day, stranding my wife in town. Fortunately, we are now seasoned classic car owners with tow ropes, jump leads, tools handy and a large-engined Volvo estate for towing things home!

Sunday, August 9, 2009

Rare!

Rare cars come along every once in a while. Sometimes rare cars are cool, sometimes weird, sometimes ugly. And the term "rare" is also often applied to cars that...um...aren't. When I stumble across any old car that I deem desirable, it usually fits the rare category just because it comes from a different time. Any "old" car is rare, when comparing it to what is on the road today.


But then there is a rare car. I mean rare. Those cars that are your personal favorites, and limited production models that are only in pictures (or imagination) of a history you never even lived in. I'm talking those cars that magically appear as a quick blip on the screen, once in a decade, if ever at all. And I am just thankful my eccentric car views stumbled on to this rare one.


This little worn out creature (read: another junker) is a rare car, rare indeed. And it happens to be one of The Originals according to the opinions that clog my brain. It is a legitimate 1964 Oldsmobile 442. This car was released quickly, late in the production year, as an answer to the competition posed by Pontiac's new GTO. The '64 GTO was selling far better than anyone expected, and Oldsmobile decided to bust out a last-minute option on the F-85/Cutlass line to try and catch up to speed. The 1964 442 became the addition of the B-09 option code, which was the Police Apprehender package. This included the Cutlass 330 c.i.d. engine with a different camshaft bumping horsepower from 290 to 310. The package also gave front and rear sway bars, fully boxed lower control arms, and extra frame reinforcement. And the new little 442 name meant four barrel carburetor, four speed transmission, and dual exhaust. This was also the only year that the moniker "442" meant its original meaning. None of the '64 442s were automatics, and they all had the B-09 option. The rusty red hardtop I just picked up is one of only 1,842 hardtops made in '64; 2,999 total '64 442s being made. Compare that to the production numbers of the '64 GTO, which I also consider rare. There were 32,450 of those built. Big difference.
The '64 is hard to document, and can only be considered a real 442 if it has the correct B-09 options. This little clunker has 'em all, even the extremely rare (and expensive!) dual snorkel air cleaner. It is a long way from its original condition, and will likely be my first body-off-frame restoration of a car. I am planning on replacing entire rear 1/4 panels, welding on new floors, trunk, window channels, and more. This little car is going to be a huge project. But it is also a huge piece of automobile history...to us lovers of old American cars, anyway.

Thursday, July 9, 2009

Bel Air Minor Details

Minor details are finally getting the attention they deserve. I stripped the yellow steelies, sand blasted and then primed them with Variprime. Then I sprayed the wheels with Martin-Senour gloss black catalyzed urethane. This stuff is wonderful paint...and very affordable compared to the other brands. My local Brian's Auto Napa store carries the whole line of Martin-Senour. Brian (the owner) mixed my 1/2 quart of "Pepsi Black" himself . And the paint turned out excellent.


The trim is slowly getting attached to the Bel Air. It is tedious but rewarding. Most of the trim pieces are in good shape, just requiring bufffing with tripoli. Attaching the trim is slow at best, and I'm finding out I will have to make or buy some of the trim clips and fasteners. The photo below shows the taillight mounted...it looks like a car again!

Sunday, June 28, 2009

Paint is On!

The '54 Bel Air post coupe is finally painted, and it looks good considering I did it in my drafty small garage. The picture below shows more primer coating and blocking work just before paint time. After I blocked and sealed any more needed areas, I removed all masking and cleaned the surface, scuffing any new sealed spots with a fine Scotchbrite. Then I re-masked the entire car again, mixed up the paint and sprayed it on.


I mixed the catalyzed urethane as per instructions and sprayed one fog coat followed by two wet coats. The paint is Hot Rod Flatz 30% gloss Dark Gray Primer Tone, an actual color with UV inhibitors meant to be a final coat. This stuff is known to cause tiger stripes when sprayed by professionals, but I was happy to see it turn out actually very even on the Bel Air. There are still imperfections, but it turned out better than I expected! I just hope it resists chalking and fading as it is supposed to. Also, the paint turned out true 30% gloss, which settled my fears of it looking too shiny. Many example cars covered with this brand end up looking too glossy, but this matte finish is just right. The work has paid off!


Just need to straighten and polish the trim, and then I can put this car back together.


More pictures show the matte dark gray urethane. It coated and blended well.


And no, the wheels are not going to remain bright yellow! I am leaning towards full gloss black or maybe a neutral green or tan...
And yes, the plain steel wheels stay on the car.

Sunday, May 24, 2009

Bel Air Due Process

The '54 Bel Air is wading through its facelift on schedule, without too many problems. This is a first...! The rocker panels I formed (in the previous post) are done and safely covered in etching primer. The picture below shows the pass. rocker panel with its next (epoxy primer) covering. I started tearing into this car after the rocker panel rust repair by removing all the trim. And boy there is a lot of trim clips! After all trim, lights, and bumpers were removed I started the arduous task of lining up the body panels. The driver fender was mounted too far forward, and with the help of my brother I managed to line it back closer to the door. The hood required much adjustment, including moving the passenger hinge location forward and up. I had to pry the springs from the hinges in order to line up the locations properly. Last adjustment was the passenger fender. With the help of body shims and loosened bolts, I moved this fender inward and a little upward.


After all the body adjusting and trim removal, I started scuffing the existing paint and primer, focusing on any areas where surface rust had flashed underneath the primer. I ran 80 grit on the 6" random orbital sander to strip the thin pools of rust, and to thin the flame job that was much thicker than the rest of the car's primer coat. Then came general blocking with 80 grit on the 17" power inline sander. I just ran it up and down at 45 degree angles, keeping the movement flat. This showed any new pockets of underlying surface rust.

After all of the initial scuffing and blocking, I treated all the bare steel areas with Valspar etching primer as well as Dupont Variprime etching primer. Then, started the masking process and shot three heavy coats of Valspar LIC epoxy primer, which is very high solids stuff. It was almost impossible to mix the stuff, it is that thick. After this, I sprayed a fog coat of cheapo rattle can black and started blocking away...


The above picture shows a couple of the blocking tools I am excited to begin using. The small manual one is an excellent product that Scotton Tools makes in California. I bought their set of high quality block sanding tools at Pomona from the company owners, and I am amazed at the quality and price. These are excellent tools, and the price is low...too low! I will take these USA made Scotton Tools any day over the more expensive ones available at local autobody supply shops.

The red pneumatic sander is a nice little Viking V101 that I picked up at the UVU swap meet for ten bucks. It was new, and after taking it apart I simply had to carefully file off a burr on the piston. Now this $250 Viking tool works great.


Here above shows the arduous process of blocking all that thick primer, removing the black fog coat until all is gray. That shows it's flat. You can see I have still a ways to go downward.


Back view in above picture shows I'm almost done blocking the trunk. I have been going with 180 grit to break through quick without going too rough.


Top of hood shows where blocking has been going, and front shows the fog coat still un-sanded. Again, I just block until the fog is gone. The front of this hood also received filler on small flat spots where original emblem holes were welded shut.

The Bel Air is actually very straight, and I didn't have to do any more straightening or rust repair. I will definitely need to prime and seal the car again after this first blocking, but then I should be close to paint time. The Bel Air is finally in the works, and it is going much quicker than I ever expected, especially since the injury. It is nice to be progressing in the old car obsession-I actaully feared this would no longer be possible after the TBI. But here it goes!

Sunday, May 3, 2009

Pontiac is Dead...Who cares, Right?

Pontiac is announced to be no more, just as Oldsmobile was a few years ago. The economic recession (putting it easily) is of course reasonable as to why. And who really cares? I mean, Pontiac wasn't true Pontiac after 1979, when the Pontiac-specific engines finally died. Golly molly, I secretly think that Pontiac's lost their beauty closer to 1970.


So I hear the news about Pontiac's final resting place, and I feel, um, a little sentimental. And I'm still wondering why...nobody likes ponchos nowadays, right? And I always preach that American cars aren't what they used to be. What's with the empty feeling that Pontiac is no more? I guess it's that sentimentality thing. Look what Pontiac used to do. Observe the cutting edges they would reach throughout the '60s. Man, I wish they could have continued past the big break of the oil embargo and emissions crackdown at the beginning of the '70s. I wish the design and concepts would have lead a different path after 1970. I wonder how interestingly mean the Pontiac engines would have become if the GM brass wouldn't have restricted engine size, warranty, etc.


Check out the ads and pictures below. This is what it once was...These are just a glimpse of what happened, and what could have been.


Remember the awesome OHC Sprint, a totally different approach that John Delorian designed? Over-head-cammed six banger with a timing belt and a Quadrajet, reeking of European flare, yet so U.S.A.


These '66 and '67s had a neat trim line and that wild OHC 6 in them. Cool, rare, different.


Remember when Mickey Thompson was the Pontiac racer? This guy raced the Super Dutys, the Bonneville Salt Flats streamliners, and more when Pontiac motors were kings. The above ad shows how in-depth M/T went with the Pontiac's.


The above ad shows the '62 Grand Prix. These eat, ate, and will continue to eat all of the other full-size cars of 1962 for dinner. Their design: Simply unmatched.


Yes, 1970 shows not just a last hurrah, but rather a capstone. Look at the lines of the '70 GTO/ Judge. Look at the cute/cool/tough-yet-appealing ad. The Humbler. That car's looks alone dwarfs all the other musclecars of the day. Yes, all of them.


Look at the above '68 cover of Hot Rod. Here's unbelievable stuff old McKellar at Pontiac was coming up with. Those aren't plastic models, and those aren't copies. What if those engines could have ever seen production...this is when the sky was the limit.


Remember when NASCAR wasn't just for rednecks, and the cars really were unique to their builder/racers? I don't either! But in days before my life, this is what happened. Look at the Catalina above. Nope, not a generic clone of every other car on the track with an identical c.i.d. motor. And it's not ran by a giant corporation that blankets a bunch of other cars. Yes those are the real trim, bumpers and headlight bezels. This is when Pontiacs were the leaders. This is also when the term "NASCAR" still actually meant what it says: STOCK Car Auto Racing. I don't get the generic bubba vibe from these early years, when a stock car had to be one sold to the public. And when small-time guys would still be contenders, even if the car they raced was a couple of model years old.


Testing the Supercars? And leader of the photo pack is none other than the single-most cool factory car ever made, the 1965 Pontiac Lemans GTO.


More of the same in the above picture? Yes, but I happen to like it. The prom queen at the small-town football game. And the flashy '65 Tempest Lemans convertible, red with Rally I's and the proper thin white-striped bias ply's. This is what I remember hometown being. This is what I want hometown to stay.


The above ad shows the first real musclecar's meek first step into the world. And from this little '64 GTO's beginning came the rush that was followed by all the others.


Fifties cars, did you say? Yes, I'll take this '55 Pontiac any day over the common tri-five Chevy's. No offense, I just miss my '55 Catalina 870!


This last picture shows the unbelievable style achieved by Pontiac in 1960. This ad (done by AF/VK, the best illustrators of any car ads ever) displays the unmatched front end offered by Pontiac. The other '60 full size cars don't even come close to the lines of a '60 Ventura, or Bonneville, or Star Chief. The '60 Pontiac feels like a tiny taste of art deco, mixed with Bellflower-era custom jobs, yet totally spot on. Not wannabe custom; just beautiful design. And you should see the back of a '60 Ventura. In 1960, nothing came close to these Pontiacs, and that is why custom builders (from Bellflower or anywhere) didn't change a thing on them. Remove trim? No. Add a custom grill? There is no better custom grill. All that was acceptable was a 2" drop, or like my dad's '60 Ventura, a cool set of chrome reverse wheels on the back with bigger "drag" tires, and plain steel wheels on the front with baby moons.


I guess this is why losing Pontiac left me feeling a little sad. I miss the Pontiacs that the old timers miss, the ones that ended a long time ago. But hey, they still lurk in the shadows...every once in a while an old jewel like these can still be found!

Sunday, March 29, 2009

Out with the Old, In with the...Old!

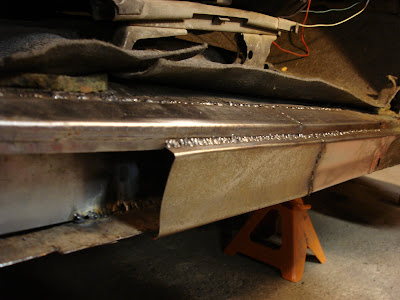
Since the '64 is officially outside for it's completion, The 1954 Bel Air got the indoor spot. And the Bel Air is getting it's share of attention lately, since the cold spring weather has left the car hobby indoors. I have been wanting to strip and repaint this car for a long time, but there are a few things that I need to do in order to get to the painting stage. This past week I started replacing the rocker panels, and am now almost done fabricating and installing the passenger side.


The rockers were actually well cared for considering the rusted panels were not replaced, but carefully 'glassed and filled. The problem was that the panel's covering had become exposed to moisture since the car was never finish painted...it was left in regular primer. The water was then able to get to these places and formed slight rust underneath the fillers and fiberglass. So I decided to rip the filler off, cut out the panels and fabricate new ones.


Above shows the 'glass and filler removed, and a small section chopped off. This also shows the extensive rust in these rockers that was previously ground and covered.


Here's the picture of my pattern I used to make the new rocker panels. This is the small piece I cut from the gap shown in the previous picture.


Above shows the progress I've made after removing the rest of the rusted area. I used nice sheet metal strips on my homemade metal brake, bending the small angled areas. I then punched the overlap and contact sides with my cheap-o pneumatic flanger tool. This allowed the top panel to slide under the original flooring, and still meet the floor's edge flush. The bottom pieces had two bends formed, and then were carefully laid on the floor upright, while I leaned a 2" piece of exhaust tubing gently on the center. This leaning pushed a matching, gentle radius into the piece, making it fit the concave shape of the original rocker.

The welds will require being ground, but the whole project is turning out fine.

Am I sidetracked? Umm, not really...I mean, I did move the car that I claim to be focused on (the '64 LeMans) outside, and brought the Bel Air in. But hey; out with the old, in with the old!

Saturday, March 21, 2009

Completion (version 2.0)

I managed to get back to finishing the '64 Le Mans. It is officially outside, which means I can continue color sanding, buffing and everything else that was abruptly stopped last May. As said before, this car is many lessons learned. It is also a little bit of a cobble job, but I do still like it...

This Friday I pulled the window channel and wheel well trim from the garage rafters and started the process of getting them presentable and back on the car. The wheel well trim is polished and on the car, as well as the windshield and rear window trim. The pictures below show what's been done, with a little explanation under each.


The above photo shows the little holes on the trunk area that patiently await their emblems. On the left side will sit a Hurst Equipped badge, and the stock badges go where the other holes are.


This shows the windshield trim I finally got on. I had to tap out the few dings, then sand with 220 grit carefully around tapped area. Next used 400 grit wet, then buffed on the small buffer wheel with medium compound and finally on the big 8" buffer with the fine compound. The stainless wasn't perfect, but came out ten times better than it was!


This one above shows the polished wheel well trim on the passenger rear. This piece fit well, using the stock holes and not fighting with the usual "Bondo sculpture".


Here's the left rear wheel well trim just installed, and it hides a multitude of sins...or scars, at least. This entire lower quarter panel was welded in by yours truly, and wasn't exactly an accurate piece, given it was a Canadian repop that had been cut off a GTO. The panel was welded on wrong and warped, so a kind Pontiac lover chopped it off and gave it to me. After much cutting, fitting and MIG work it became this LeMans' quarter panel. I even had to stamp the correct well edge into the area where the trim sits, since the Canadian reproduction panel isn't exactly accurate.
Now, years later as I am putting the shiny wheel well trim piece on this spot, I can honestly say it doesn't exactly fit like it should...but hey, it looks good in the picture. I just have to remember, this car is a nice 20-footer; any closer and your eyes start noticing the hodge podge!


This above pic is the rear window trim finally on the car. This feels good-the '64 LeMans has been a long learning project. The trim polished up nice with the previous mentioned process.


Here is a side shot of the interior work that is in the still-unfinished stage. You can see the new headliner is almost done, and the new correct dome light is installed. So far, I'm happy with how this car is coming out, even though it is truly a first-timer in most ways. I just remember to keep people at least 20 feet away and to take fuzzy pictures in low light. Using those strategies always lets this old '64 look great.
Yes, it looks awesome, doesn't it? Please, don't get any closer...!

Monday, February 23, 2009

Progress

Jenna took some neat photos of the little buggy car while we took it on it's maiden voyage. Here's one of 'em:


Sunday, February 15, 2009

More on the Floor

Floor boards are finished and trial fit. I think they look actually fine, too. The flooring was all fabricated using small angle and square tubing, and the floor panels are plywood, carpeted covers. I made the panels and console all removable, and then formed some rocker trim on my metal brake. I also made a nice fitting master cylinder access panel in the driver's side floor. All in all, I like the way the flooring looks, and I like to be able to remove panels easily for shifter work, brake adjustment, etc.


Above shows the pieces beginning to get mounted, and the little brake master cylinder access panel.


Close shot of shifter and access panel area.


Here's the inside view of the console. I made this by shortening an old large drill press top cover, cut the forward angle and lined up all points for the shifter assembly.


Here is another close shot showing the rocker trim I made from more kind freebies at Creer Sheet Metal. I bent them on my homemade metal brake and formed little notch area with tinsmith pliers.


Here is the brake access panel area shown installed. Fits well, only two trim screws hold it in place.


There is the entire setup with the seat baseboard in place. The shifter is a Lokar nostalgic automatic-trans unit. Not exactly period correct, but looks good.


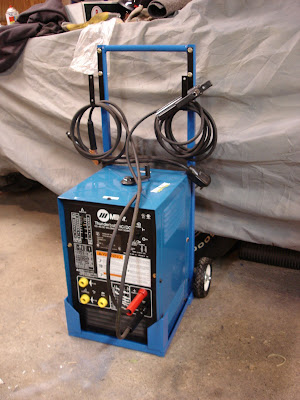
This shows the side-tracking I often do from my old car obsession. I decided to make a dolly for my DC arc welder, since the mobility it comes with from the factory is a little useless. I can wheel it around now, and keep the cords mounted out of the way. Yes, this fits under the more "obsessive-for-tools-because-of-old-cars" category... but who needs a stick welder for old car restoration? I love my MIG's but this little monster can make some strong, X-ray quality welds on bigger stuff (like frames) inside or outside, with safer DC amperage and 7018 rod. See, I have no need to worry, I always justify my tools...(cough)...somehow!

Thursday, January 22, 2009

Consider it Done


Done: The rear view mirror that I cut, welded, threaded and finally decided to install. I got this little mirror for pennies at a scooter repair shop. I had complained to Jenna about the need for a set of mirrors that would look acceptable on the Model T. And I didn't really want to fork out the money for plastic cheapo hot rod aftermarket ones, let alone "billet" style newbies...yucky! I mumbled to Jenna that I needed small, thin, round mirrors with a baby fixture that I could modify. She told me to check a...(cough)... scooter store. Scooter store? I vowed never to affiliate with such annoying falsities long ago, when I saw the Vespa craze creep into style. She just couldn't be right- what kind of replacement mirrors are they going to have, anyway? Well, I was the wrong one! These turned out amazing after a little for-mentioned cutting, welding, etc. And they were CHEAP compared to anything out there, not to mention stainless and chrome plated steel all the way through.


Done: Steering column fabricated, oldie 'wheel center and gauges installed. Column was fabricated from scratch and some old u-joints. Gauge bezel is an old piece of brass I machine-turned and cut to follow the factory lines where the original dash items would sit. Column mounted tach, old Signal Stat 900 turn switch, oil pressure and coolant temperature gauges are in and done. Oh, and they actually all work!


Done: Fabbed a seat framework that will allow me to sit at a decent level, without being too high like the stock ones. That, and the original seat frame/riser panel was long gone. I made this little scrapper out of angle and light square tubing from old cut off ends in the drafty garage. The seat frame is set to hold a single sheet of plywood, and the foam cushion will rest on that. I've tried the plywood on there, it works good. The seat's angle is comfortable, and will look fine.