-->

Ads Bidvertiser

Monday, June 6, 2011

Topless Time at Charterhouse


The Charterhouse July auction of classic cars has a great selection of convertibles cars ready to be enjoyed during the summer months.
“This sale is held in the beautiful parkland setting at Sherborne Castle where we put up a large marquee overlooking the lake, and is in conjunction with the very popular Classic and Supercar Show held on the same day.” Commented Matthew Whitney. “The classic car market is particularly buoyant at present and we have had high prices achieved at our last specialist auction whiich was held at The Royal Bath & West Showground,”
Of the many entries already confirmed for the Charterhouse sale, there are a good number of cars looking to provide their new owners with fun open top motoring including a 1927 Rolls Royce open tourer. The body was built by Park Ward in 1927 being one of the first years of the 20/25. It has been in its current ownership since 1973 and was bought with its believed low mileage of 39,000. During it’s nearly 40 years of ownership it has only put on another 11,000 miles! It is estimated to sell for £40,000-45,000.
Also in the sale is an Austin Healey3000 MkII which has been fully restored with a bare metal respray, leather interior and chrome wire wheel s at £28,000-32,000, a rare 1955 Ford Zephyr convertible with an  hydraulic electric  hood which was previous  owned by Neil Tee, the chairman of Consul Zephyr Owners Club at £12,000-15,000, a 1974 Jaguar E Type with 52,000 from new and owned for over 20 years, chrome wires, and a 1959 MGA Roadster, upgraded with MGB engine, unleaded head, 3 branch exhaust 1 ¾ in SU carbs for  £15,000-17000.

Charterhouse is now accepting further entries for this important auction. For more information regarding this auction, or to enter a car into the sale, please contact Matthew Whitney, Head of Classic Cars  at Charterhouse, The Long Street Salerooms, Sherborne on 01935 812277 or via email  mw@charterhouse-auctions.co.uk

Captions:

A Rolls Royce 20/25 Tourer £40,000-45,000
An Austin Healey 3000 Mk II £28,000-32,000
A Ford Zephyr convertible £12,000-15,000


Quick Links
Forthcoming Sale Previous Sale Sale Preview Tel: (01935) 812277
For further information regarding this article, please contact Richard Bromell, Partner

Monday, May 16, 2011

Gullwing looks to fly at Charterhouse Car Auction


The Charterhouse auction of classic cars and automobilia at Sherborne Castle on Sunday 17th July includes an ultra rare Ostermeier Mercedes 300SL Gullwing.

“We have had a great start to the year with our classic car auctions and have now been instructed to sell this Mercedes Gullwing re-creation at our next auction in the wonderful grounds of Sherborne Castle” Commented Matthew Whitney. “It has been consigned for sale by a West Country collector and has been much admired at recent outings, with the only real giveaway being the tax disc shows the car is not tax exempt. The quality of the Ostermeier re-creations is legendary and it even comes complete

with custom made fitted luggage in red leather matching the interior of the car.”

This Ostermeier 300SL Gullwing is just one of about 250 made and although it is estimated at £150,000-180,000, is offered for sale at a fraction of the cost of an original 300SL Gullwing. Built in 1998 it comes with full Mercedes history and speedometer records just 4,700 kms from new. Also entered into this important auction of classic cars are an Austin Healey 3000 £27,000-30,000, a Jaguar MkII 3.4 litre £17,000-19,000, a Jaguar E Type convertible £30,000-35,000, a Ford Zephyr 6 convertible £12,00014,000, a Porsche Carrera replica £10,000-12,000,  a Jowett Bradford van £7,500-8,500 and for someone looking for a restoration project there is a rare Bristol 408 at £3,200-3,500.

For more information regarding this auction, or to enter a car into the sale, please contact Matthew Whitney, Head of Classic Cars  at Charterhouse, The Long Street Salerooms, Sherborne on 01935 812277 or via email  mw@charterhouse-auctions.co.uk


Matthew Whitney and the Ostermeier re-creation Mercedes 300SL Gullwing going under the Charterhouse hammer in their auction on Sunday 17th July at Sherborne Castle, Dorset £150,000-180,000
Quick Links
Forthcoming Sale Previous Sale Sale Preview Tel: (01935) 812277
For further information regarding this article, please contact Richard Bromell, Partner

Saturday, April 16, 2011

More Progress 2.0


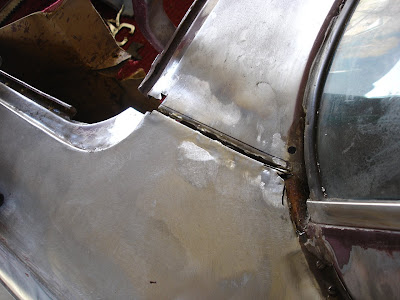
I thought welding was over! This seam where the 1/4 passenger 1/4 panel meets the body just behind the rear window has just been replaced. The above picture show the replacement pieces tacked in place, which below I'll show the process of making and fitting them.

The reason I replaced this area is because the passenger 1/4 panel was replaced in the '60s, and anywhere lead was reapplied (joint seams) I have stripped, since most of the leaded areas showed bulges starting to appear. When the lead was removed here, I found rust creeping into the joint. I also discovered that the seam had been aligned poorly, with the new 1/4 being mounted higher than the package tray area it meets to, and then banged at the edges down in an attempt to level things up. There was also a lot of lead, and it wasn't just for the seam.

The factory joint was an area where two 90 degree angles meet, giving two flanges that meet underneath to be spot welded together. Then lead was applied to cover the seam, but still scored with a small groove that shows in the finished paint job, giving a neat appearing seam line. I would imagine that the seam line is scored into the lead at this place to channel flexing and shifting in the body from opening the heavy trunk. Kind of like seams in concrete that prevent cracks forming and allow expansion.


Not only was the flat area of the seam needing help, but the part that angles down into the trunk channel was hammered rough, brazed, and gobbed with lead. It was crusty and rust prone, as well as holding the misaligned 1/4 seam from lining up smooth. So I cut the area out, and will have to make patches for it.


This picture shows how out of alignment the top edges were, requiring the new edge to be banged down and lead slathered all over.


Here in the above picture you can see the huge gap that was brazed and leaded. This gap size scared me; It appeared that it would be more prone to stress cracks and I didn't want to dump tons of lead back into it. Also, it was pitted with rust which I did not want to clean out.


Here is one of the flange areas cut out. This one was the package tray side, showing where an original spot weld had been drilled out when they removed the original 1/4 panel.


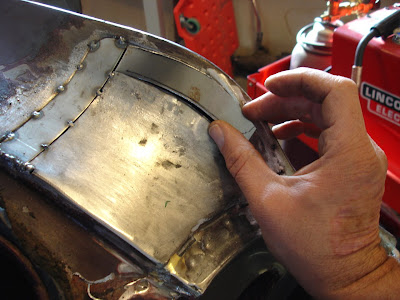
After cutting the flanges out, I made this little pattern to compare the new pieces to as I made them. This way I wouldn't have to run back and forth between the shrinker-stretcher and the car, checking for fit.


To make the repair pieces I just used a brake to bend the angle, and just a tiny bit of stretching on the downward flanges.


Both pieces are formed and stretched to proper contours, ready for trimming to fit.


Here shows the 1/4 panel piece is trimmed down and ready to place.


Above shows the piece tacked to the 1/4, fitting nicely.


And here is the other piece trimmed and fitted, ready for tacking on. I went on to tack weld it on, and as the first picture of this post shows, I was able to gently position the 1/4 panel edge down to perfect alignment with the package tray area, with the seam meeting just as the factory one did. Now I can move down to the trunk channel area and start making pieces to fit.

One thing I forgot to do is punch holes in the inside flange. Now it will be a chore figuring out how to plug weld the flanges underneath together. Oops! Other than that, the repair is working nicely. I just need to make sure I weld the flanges together before I start making the pieces that extend into the trunk lip. Now I think a small spot welder might come in handy...

Monday, March 7, 2011

100 Mile an Hour Man


Charterhouse Auctioneers have been instructed to sell the highly important collection of photographs, trophies, Brooklands badges and ephemera belonging to the great late Claude F Temple, the motorcycle manufacturer, Brooklands racer and motorcycle speed world record holder. The collection is expected to sell for over £5,000 when it goes under the hammer.

“Rarely do such historically important motorcycle items appear on the open market, as the majority is held by museums, institutions or is in private collections.” Commented Matthew Whitney. “He was the first person to cover 100 miles in less than one hour on a motorcycle at Montlhery in 1924, when he covered 100 miles in 58 minutes and 50.6 seconds which is equivalent to 101.982 mph. Just a couple of years later, in 1926, he became the fastest man on two wheels when he took the world speed record on a motorcycle at 121.3 mph. This is a fantastic collection from a golden age of motorcycles, when men were men and health and safety had not been invented.”

This is the first time the collection has appeared on the open market. It comes direct from a close family friend who lives on the Isle of Man, home of the famous motorcycle races. The collection will be auctioned at the Footman James 32nd Bristol Classic Car Show on Sunday 17th April together with other interesting items of automobilia, motorcycles, vintage and classic cars, including a 1948 Bentley Mk VI Special, at £48,000 – 52,000 and a 1960 Jaguar Mk II 2.4 litre manual overdrive saloon, with only three owners all living within 10 miles of each other in Devon estimated at £10,000 -12,000. Perhaps more fittingly however, there is monster of a motorcycle in the form of a Suzuki GSX-R 1000. This has been extensively modified by Harris Racing as their show bike and demonstrator. Painted in Barry Sheene racing colours, this bike is capable of over 200 mph, and estimated at £7,500-9,000.

For more information regarding this auction or to consign a single item or a complete collection, please contact Matthew Whitney at our head office in Sherborne on 01935 812277 or via email  mw@charterhouse-auctions.co.uk and please visit our website www.charterhouse-auctions.co.uk to  view the regularly updated Classic Car preview pages.

Making history on a motorcycle – a group of photographs of Claude Temple from his own archive.Quick Links

Forthcoming Sale Previous Sale Sale PreviewTel: (01935) 812277
For further information regarding this article, please contact Richard Bromell, Partner

Monday, February 7, 2011

I Have That Jaguar

Ok, so I've talked about this for a while. And it's happened. Sitting in my garage is a beautiful, flame red and black leather, 1990 Jaguar XJSC.

It's awesome! Of course, it's a crazy car. I can't afford to run it, but I'm proud to own it. Why did I buy this petrol-guzzling luxury monster? It was, quite frankly, a steal! I think I am going to sell it again soon, but right now I am enjoying the hell out of having it.

This car represents the end of an era. I don't think anyone will make a production V12 engine again, ever. It just doesn't make sense, but as a genuine collectors piece and as an amazing statement of luxury from a time only recently passed, I love it.

If you live in Europe (France, Italy, Germany, Spain, etc.) and you want it, email me. Otherwise, I'm going to have a bit of fun and decide when I'll eventually put it up for sale. For now I'm grinning ear to ear as I drop my toe and get pressed in to the seats while listening to my favourite CD with the electric hood down!

(PS - not a great photo, but will post more when I've taken them.)

Monday, January 24, 2011

There are E Types and Our Types


Lot 183 A 1972 Jaguar E-Type Series III V12 coupé, £32,000 - 35,000


Lot 186 A 1933 Lagonda 16/80 four door pillar-less saloon, £28,000 - 32,000, also in the sale


One of the motor industries icon, a Jaguar E Type coupe, is included in the Charterhouse auction of classic cars on Sunday 13th February held at The Royal Bath & West Showground, Shepton Mallet.


Please click on the logo to go to the Bristol Classic Car Show Events Web Site, where you will be able to buy tickets to the show and catalogues to gain entry to the auction


“We have sold many E Types over the years, but this one is a little more special than most, having covered just over 4,000 miles since new. It is a Somerset registered car, having been bought by a Commander at Yeovilton in 1972. I can only assume that the Commander served abroad for some time which could explain the lack of use of such an iconic motor car. “Commented Matthew Whitney”. When the Commander sold the car, it remained locally and the purchaser then passed the car onto his son. At this point, the car had about 3,000 miles put on it and was then laid up in a barn until the Charterhouse vendor went to buy a tractor but spotted the car and bought it instead!”

The car has subsequently undergone a total nut and bolt restoration, and a change in colour from maroon to metallic ice blue which is still a Jaguar colour. As the car has been dry stored for most of its life, it was very straight forward to dismantle the car, with only two bolts shearing in the process. The car was then rebuilt rather than restored even having a complete new cream leather interior. This E Type is now presented in a better than new condition and is so clean you could eat your dinner off it! Not unsurprisingly, the cost of parts alone came to over £27,000 and combined with 6 months of labour to be added on top, it is estimated at £32,000-35,000. This “new” E Type is ready to celebrate 50th anniversary of the E Type and will no doubt give the new owner miles of smiles.

Charterhouse is now accepting entries for their busy programme of auctions including classic cars and automobilia on Sunday 13th February followed by silver, jewellery and watches with a special section of wine port and spirits on Friday 25th February.

For advice or to arrange a free home visit, please contact Matthew Whitney, Head of the Charterhouse Classic Car Department or Sarah Parsons at Charterhouse, The Long Street Salerooms, Sherborne, Dorset DT9 3BS, 01935 812277 or via email
mw@charterhouse-auctions.co.uk


Forthcoming Sale Previous Sale Sale PreviewTel: (01935) 812277
For further information regarding this article, please contact Richard Bromell, Partner

Sunday, January 16, 2011

More Progress

I am still cranking away at the '62 Oldsmobile. It feels like grunt work when I think of the entire process; never ending with no finish in site. When I recount details of what I've accomplished, though, it becomes a satisfying progress sheet. (That is the main reason for writing a boring blog about fiddling with old cars!)

The other benefit of these labors is I am learning. Learning real-time, even at the risk of doing it "wrong." I like to call tearing into a car the "school of hard knocks"...literal hard knocks! I am learning, tuning, even kind of perfecting, if I dare say, this craft. It actually does improve with time, too.

Next chance I get, I'll brush some toxic slime on an area not yet stripped and start massaging sheet metal as I wait for the slime to do its job. And I will do so with patience, knowing I am making progress on the car and my skills at the same time.


Speaking of toxic slime, I've managed to remove the paint and filler from almost all of the driver side. I use Aircraft Stripper, and it works good.


I am beginning to bump metal here on a spot at the edge of the hood. It is harder than I thought, yet already very rewarding. I'm finally learning to do it correctly. I also am learning to stop when I've reached a good point, instead of bumping too much and making things worse.


This above picture is a happy one. I have just finished stripping all paint and primer from this lower portion of the passenger fender and it is smooth! Clean! No dents or rust! This is what we hope to find everywhere, but never do.


Here I have just masked the trim holes and door edges to protect from stripper seeping into places I don't want it. It is VERY powerful stuff (and dangerous, too) so I keep it from getting anywhere other than the major outside areas. At the rear 1/3 of the door's center is a spot I've bumped back into place. This area was bent inward right along the trim line, and required careful hammer-off-dolly to bring the steel back to proper contour. It is not perfect, but an exciting improvement!


Just a full shot of the hood, stripping and light bumping of small, shallow dents being completed. Now I have small surface rust spots to remove and final sanding. Then it will be ready for spot filler (if it actually needs any) and primer.


This above shot is a close up of the passenger door area that was banged inward. It came out better than I expected.


This last picture shows an area that began as a frustrating find. I was simply removing what appeared to be light filler when resorted to using my propane torch to soften and remove a deep chunk of Bondo in both areas. The car had been banged here, and the previous bodyman had used a slide hammer to attempt to pull it out. The screw holes where the slide hammer attaches were still there, only filled with the Bondo. And the dents hadn't been pulled much at all. There was still a depth of about 3/8" at the deepest point of these dents that the plastic filler had been used to cover. (Why even use the slide hammer if one isn't going to pull the dent out much at all?)

Anyway, I ended up pulling the panel out farther with my slide hammer and welding up the holes. The bottom area I bumped extensively with the hammer and dolly, but was still too warped and stretched for me to leave. So I cut the spot out, remade an inside wheel well lip (patch) and welded in a new piece. Whew!

Thursday, January 13, 2011

Star Car Vanden Plas


A 1959 Austin A105 Vanden Plas is one of the star cars at the Charterhouse auction of classic cars on Sunday 13th February held at The Royal Bath & West Showground, Shepton Mallet.

“The name Vanden Plas has always been synonymous with great motor cars, having coach built cars for Rolls Royce, Bentley and other leading manufacturers.” Commented Matthew Whitney. “However, the involvement of Vanden Plas in the A105 is historically important as it was the first time a mass produced Austin was upgraded by Vanden Plas. The car would leave the Austin factory and be delivered to the Vanden Plas coachworks at Kingsbury, London, where the cars would receive leather upholstery, cloth headlining and walnut trim.”

This rare classic car, just one of only 500 made, with only 5 believed remaining running on the road, has been owned by the Somerset vendor since 1968. Fitted with a 3 litre straight six engine coupled to a floor change four speed gearbox with overdrive, it would be propelled from 0-60 mph a fraction over 15 seconds when new!

Charterhouse is now accepting entries for their busy programme of auctions in Sherborne including classic cars and automobilia in February followed by silver, jewellery and watches with a special section of wine port and spirits a couple of weeks later.

To arrange a free home visit, please contact Matthew Whitney or Sarah Parsons at Charterhouse, The Long Street Salerooms, Sherborne, Dorset DT9 3BS, 01935 812277 or via email sp@charterhouse-auctions.co.uk

A rare sight on the roads, an Austin A105 Vanden Plas £8,000-12,000
3000cc engine
Luxury Vanden Plas interior
Quick Links

Forthcoming Sale Previous Sale Sale PreviewTel: (01935) 812277
For further information regarding this article, please contact Richard Bromell, Partner

Wednesday, December 29, 2010

More Olds!

I am back at the '62 Oldsmobile, this time finishing the last rust areas and a leaded area that started bubbling. The passenger rear corner had bulges in the lead applied to cover the overlap seams where the rear corner piece meets the 1/4 panel. The factory did this the same way after spot welding the panels together. This particular area was redone when a new entire 1/4 panel was attached sometime early in the car's life. The liberal use of lead indicates this to me.

The body man attached this area of panels with brazing and sheet metal screws, with welding elsewhere. Then the seams were covered with lots of lead. I would never have messed with this area, but here is where the lead was bubbling. After removing lead from the seams I found pockets where something didn't get along with the lead and steel living together. I wonder if it was a sort of oxidation, impurities in the lead, or the steel base not being totally prepared.

So I began to remove all of the lead with careful heating, pushing soft blobs away and wiping the wet lead with a rag. The lead used seemed extensive; I also didn't want to put lead back onto a not-so-perfect seam full of crevices and overlap, being afraid that no matter how clean I get it, there would likely be remaining impurity issues. I didn't want the bulges to reappear after I finish this car. So I decided to remove the overlap areas entirely, and weld new sheet metal patches level with the outer area.


Forming little pieces was not difficult, as I had a nice pattern to follow. The curves were very easy since the patches were so small, only requiring using my hand and pliers to shape them. The main reason I made one small patch (and attached it) at a time was to keep the overall shape of this panel in line. This helped me avoid moving the middle panel out of alignment with the shape it needed to follow.


This is the only time I needed any other tool than my hand held pliers. I just needed a little bend on the brake.


Second to last piece being fitted for trimming.


Careful grinding, filing and a little picking with the body hammer left the pieces pretty smooth. Now I can use a little bit of filler and the area can be fully cleaned/scuffed for adhesion. No lead needed, either.


Not too bad!


Here's an area under the pass. door where I needed to make a new patch. The brake, stretcher and hammer-on-anvil were used for this little patch. Welds still look nasty, just waiting to be carefully ground smooth.


Sunday, December 19, 2010

Woodward Fab Bead Roller Modification

I've been wanting to try a bead roller. Ever since I began setting up the construction of my '30 Model A coupe I have wanted to be able to form floor panels and body patches that would use beads, grooves and flanges. Problem is, I don't want to spend $1,000 or more for a decent roller and set of dies. But through online searching I've found actually good information on the cheapo bead rollers from Harbor Freight and others. There is just one catch...they need major stiffening side to side and up and down.

The picture below is the one I decided to go with. It is from Woodward Fab, and comes with 6 sets of dies. It is made of solid steel plate, just shy of 1/2" thick, and has an 18" throat. It feels better than the Harbor Freight one, being a thicker plate (HF one is 3/8") and having grease fittings. It is also identical to the Eastwood economy model, likely from the same Chinese factory. Plus, the Woodward Fab tools in general have a good reputation, especially compared to HF.
The above picture isn't my attempt at advertising- I was just too lazy to remove the "super low price" artwork.
So I pulled my Woodward Fab bead roller out of the box, installed it on the vise, assembled it and gave it a try. The dies do their job, and it stays fairly lined up, but the frame plate has tons of flex! And most noticeable was side to side flexing. Now the plans to reinforce (and make it look pretty) begin...


The picture above shows one of the patterns I made for cutting the bottom plate. The green line is where the purchased frame plate would meet the added curved reinforcing plate that this pattern produces. I formed this and a top pattern (after lots of sketching) on Masonite with my little jigsaw, and then aligned the patterns to some 1/2" plate and plasma-cut the pieces.


Here is a picture showing the top plate and bottom plate welded to the Woodward Fab frame. I tried to give it an industrial look, like a tool in a vocational shop that has form-following-function (or maybe the other way around...) with an earlier appearance. You can see the welds are ground down and the paint from the original piece is ground off.


After using scrap from my generous boss Matt (Owner of the company I work for) and a '28 Ford torque tube, I came up with this neat stand assembly. It has an almost antique industrial look, but also spartan. It is still going to be top heavy, so I will bolt it to the floor.


Above shows another view, this of the backside. The 2"x2" square tube is actually the major reinforcement; it does more work than the vertical pieces I meshed with the original plate. This idea was copied from the very cool ideas I found online. The vertical round tube is scrap pieces I cut and lined up for holders of the dies not being used. I like the curvy-shaped plate I added to the pedestal tubing. It calms my fears of weak spots, and looks good too!


Here it is bolted to the floor. I used those female thread anchors that stay level in the concrete, so I can easily remove the bolts and move the assembly out of the way. The paint is the last drops of DuPont Variprime leftovers I had, given to me for free by an old neighbor. It is a 2-part etching primer, and I didn't want to see it go to waste. Plus, now I have something paint can bite to.


These two pictures show the assembled bead roller and the extra dies sitting on their holders.


This above pictures shows the first experiments with scraps from Creer Sheet Metal. This bead roller is going to be wonderful for floor pans, body reinforcements, and even patch panels. I see lots of possibilities!


This last pic shows the completed project including the wheel I made to operate it with. The crank it came with is not nearly as usable. I made this wheel from the foot rest of a broken bar stool, and the spokes/mounting assembly from channel scrap I scrounged from a spiral staircase I helped remove. It works with no noticed flex and cost was very low, unless you count my time and tools. But I wanted to build it...!