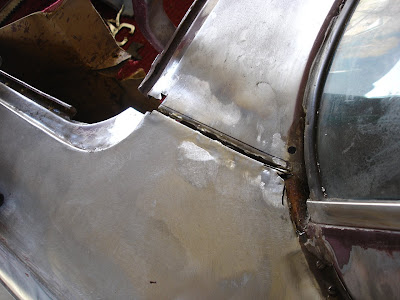
I thought welding was over! This seam where the 1/4 passenger 1/4 panel meets the body just behind the rear window has just been replaced. The above picture show the replacement pieces tacked in place, which below I'll show the process of making and fitting them.
The reason I replaced this area is because the passenger 1/4 panel was replaced in the '60s, and anywhere lead was reapplied (joint seams) I have stripped, since most of the leaded areas showed bulges starting to appear. When the lead was removed here, I found rust creeping into the joint. I also discovered that the seam had been aligned poorly, with the new 1/4 being mounted higher than the package tray area it meets to, and then banged at the edges down in an attempt to level things up. There was also a lot of lead, and it wasn't just for the seam.
The factory joint was an area where two 90 degree angles meet, giving two flanges that meet underneath to be spot welded together. Then lead was applied to cover the seam, but still scored with a small groove that shows in the finished paint job, giving a neat appearing seam line. I would imagine that the seam line is scored into the lead at this place to channel flexing and shifting in the body from opening the heavy trunk. Kind of like seams in concrete that prevent cracks forming and allow expansion.

Not only was the flat area of the seam needing help, but the part that angles down into the trunk channel was hammered rough, brazed, and gobbed with lead. It was crusty and rust prone, as well as holding the misaligned 1/4 seam from lining up smooth. So I cut the area out, and will have to make patches for it.

This picture shows how out of alignment the top edges were, requiring the new edge to be banged down and lead slathered all over.

Here in the above picture you can see the huge gap that was brazed and leaded. This gap size scared me; It appeared that it would be more prone to stress cracks and I didn't want to dump tons of lead back into it. Also, it was pitted with rust which I did not want to clean out.

Here is one of the flange areas cut out. This one was the package tray side, showing where an original spot weld had been drilled out when they removed the original 1/4 panel.

After cutting the flanges out, I made this little pattern to compare the new pieces to as I made them. This way I wouldn't have to run back and forth between the shrinker-stretcher and the car, checking for fit.

To make the repair pieces I just used a brake to bend the angle, and just a tiny bit of stretching on the downward flanges.

Both pieces are formed and stretched to proper contours, ready for trimming to fit.

Here shows the 1/4 panel piece is trimmed down and ready to place.

Above shows the piece tacked to the 1/4, fitting nicely.

And here is the other piece trimmed and fitted, ready for tacking on. I went on to tack weld it on, and as the first picture of this post shows, I was able to gently position the 1/4 panel edge down to perfect alignment with the package tray area, with the seam meeting just as the factory one did. Now I can move down to the trunk channel area and start making pieces to fit.
One thing I forgot to do is punch holes in the inside flange. Now it will be a chore figuring out how to plug weld the flanges underneath together. Oops! Other than that, the repair is working nicely. I just need to make sure I weld the flanges together before I start making the pieces that extend into the trunk lip. Now I think a small spot welder might come in handy...
No comments:
Post a Comment