Floor boards are finished and trial fit. I think they look actually fine, too. The flooring was all fabricated using small angle and square tubing, and the floor panels are plywood, carpeted covers. I made the panels and console all removable, and then formed some rocker trim on my metal brake. I also made a nice fitting master cylinder access panel in the driver's side floor. All in all, I like the way the flooring looks, and I like to be able to remove panels easily for shifter work, brake adjustment, etc.

Above shows the pieces beginning to get mounted, and the little brake master cylinder access panel.

Close shot of shifter and access panel area.

Here's the inside view of the console. I made this by shortening an old large drill press top cover, cut the forward angle and lined up all points for the shifter assembly.

Here is another close shot showing the rocker trim I made from more kind freebies at Creer Sheet Metal. I bent them on my homemade metal brake and formed little notch area with tinsmith pliers.

Here is the brake access panel area shown installed. Fits well, only two trim screws hold it in place.

There is the entire setup with the seat baseboard in place. The shifter is a Lokar nostalgic automatic-trans unit. Not exactly period correct, but looks good.

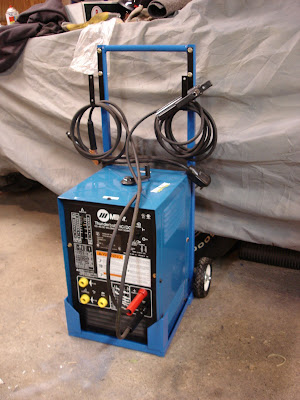
This shows the side-tracking I often do from my old car obsession. I decided to make a dolly for my DC arc welder, since the mobility it comes with from the factory is a little useless. I can wheel it around now, and keep the cords mounted out of the way. Yes, this fits under the more "obsessive-for-tools-because-of-old-cars" category... but who needs a stick welder for old car restoration? I love my MIG's but this little monster can make some strong, X-ray quality welds on bigger stuff (like frames) inside or outside, with safer DC amperage and 7018 rod. See, I have no need to worry, I always justify my tools...(cough)...somehow!
 Above shows the pieces beginning to get mounted, and the little brake master cylinder access panel.
 Close shot of shifter and access panel area.
 Here's the inside view of the console. I made this by shortening an old large drill press top cover, cut the forward angle and lined up all points for the shifter assembly.
 Here is another close shot showing the rocker trim I made from more kind freebies at Creer Sheet Metal. I bent them on my homemade metal brake and formed little notch area with tinsmith pliers.
 Here is the brake access panel area shown installed. Fits well, only two trim screws hold it in place.
 There is the entire setup with the seat baseboard in place. The shifter is a Lokar nostalgic automatic-trans unit. Not exactly period correct, but looks good.
 This shows the side-tracking I often do from my old car obsession. I decided to make a dolly for my DC arc welder, since the mobility it comes with from the factory is a little useless. I can wheel it around now, and keep the cords mounted out of the way. Yes, this fits under the more "obsessive-for-tools-because-of-old-cars" category... but who needs a stick welder for old car restoration? I love my MIG's but this little monster can make some strong, X-ray quality welds on bigger stuff (like frames) inside or outside, with safer DC amperage and 7018 rod. See, I have no need to worry, I always justify my tools...(cough)...somehow!
No comments:
Post a Comment